Quantcast
Channel: Sew Dixie Lou.
Viewing all 85 articles
Browse latest View live

Going down to Liverpool

$
0
0

Technically for us, it's going up, but I bloody love this song and I love Susanna Hoffs. Activate girl crush now Don Robot! (If you didn't know about mine and Heather's amazing invention of robot sewing assistants with interchangeable fantasy boyfriend characters...you do now).

Last weekend, Mr S and I went to Liverpool to a wedding. I couldn't believe it when my lovely Twitter friend (and now REAL LIFE friend too) Claire sent us an invite. We were so touched and booked our train tickets straight away.

I wanted to make Claire a gift as she's a fellow crafter and made me an honourable 'Nana'. That means we're little old ladies at heart who love nothing more than to sit on our sofas under a blankey or make something.

I know that Claire and Paul love tattoos so I found some awesome fabric online with a tattoo print. I thought I would make a cushion that she could keep as a memento from her special weekend. When I got married my sister knitted my ring cushion and it's on proud display in my sewing room. I love it, especially the thought and time behind it.

So, here's what I made for Claire and Paul.

Forever

It's an envelope style cushion with a 14" cushion pad inside. I used some red felt to make a heart on which i appliquéd a second heart made out of the main fabric.

I found some cool iron on 'wedding' theme transfers from Eternal Maker and used the 'Forever' image. I then did some simple embroidery over the top in a very pale yellow and steel-grey thread, and added a little pearl bead in the centre of the flower. I stitched the heart onto the centre of the cushion cover using a basic straight stitch before I stitched up the sides of the cushion cover.

I was pleased with how it turned out and Claire says she loves it - I hope ;)

Claire's wedding was so lovely. We got to the reception at six, which was held in a lovely tea room, Leaf, in the city centre. The decorations were beautiful. But, the best of all was Claire's dress. She looked so pretty and a real pin up star on the day! Her dress is from Vivian of Holloway - I think it's stunning.


We had such a brilliant time at the wedding. We didn't know anyone but by the end of the evening we felt like we had been friends for ages. I also got to meet the lovely Kirsty and Natalie who I also know from Twitter. Kirsty was bridesmaid and looked awesome in the vintage vogue dress she made. Totally impressed.

Kirsty and I getting on the prosecco

This is a bad photo/selfie of my outfit (not to mention taken in the bogs!), but I wore a skirt I had made some time ago from some fabric I bought in Vietnam. It's a slinky polyester but I love the print with the border at the bottom. I teamed it with a simple black knit jumper, necklace (which looks like a little peter pan collar) and wedges, oh and statutory beehive.


Everyone was so warm and welcoming, and we danced all night to the coolest music. The DJ played some Elvis for me but he didn't have any Rod... whaaaaaaa? No Hot Legs...oh well, only 5 days to go until I see my blonde mod at the O2.

So, big thanks and hugs to Claire and Paul for letting us share your day - it was boss! :)

But there's a pretty little thing waiting for the King down in the Jungle Room

$
0
0
Mr S has been travelling a lot for work recently, which is bad news for my blog posts as he's also my resident photographer. Tripod now added to my birthday list. No scratch that, Mr S is reading over my shoulder and NOW decides to tell me he already has a tripod and the camera has a timer on it.

Anyway, finally I have photos of my Jungle Room Pencil Skirt. 
Read more »

You're in my heart and some nonsense about leopard print

$
0
0
I'm feeling poorly, looking even worse, and have more congestion up my nose than the gunk tank on Fun House (US peeps, that was a most awesome show when we were kids), but I've still got my lovely Twitteraties keeping me company. For those lovely girls (and guys, Mr Horak!) I give you Rod. (That sounds rude, but Heather, you know I would if I could).

Thanks for hanging out with me everyday.

Read more »

All around, all of the guys call her flamingo: McCalls 6331 Romper

$
0
0
So, the other day I was sitting at home reading blogs when my boyfriend Elvis calls me.

"Hey baby, pack your bags, we're going to Hawaii"

"Hawaii? But I have to go to Amsterdam for work, and then an awards event, and I just did some grocery shopping."

"Baby, come on, I wanna play house with you in Hawaii. I'll sing you songs on the beach, we can drive a fast red car, hang with the locals. Hell, you can even bring robot Don."

"Really?.. Well okay, send a car, I'll be ready...in...WAIT I HAVE TO MAKE MY ROMPER!"
Read more »

Club Tropicana at The By Hand London party

$
0
0
It's Sunday, I could go get my groceries with the bags under my eyes, and I just bawled my eyes out at Tanya leaving in Eastenders. Typical tears from a tired alcohol-infused Clarey.

However, I wear my dark eye bags with pride as they only serve to show I had a bloody great weekend. Yesterday, I was lucky enough to attend the 1st Birthday Party of By Hand London.

I travelled with Sally (Charity Shop Chic) and we looked like a right pair on the tube in our brightly coloured ensembles. The Jubilee Line has never been brighter!

After getting the invite, I heard a calling from my fabric stash; a little Miami-tinged voice saying, "use me, baby, use me". No, it wasn't Robot Don tangled up in the swimwear elastic again thinking he was back in Hawaii with Megan, but that amazing 'Palm Tree Sunset' fabric I found in Rolls and Rems, Lewisham (yeah that place AGAIN!).

So, I thought, it's screaming to be made into a Victoria Blazer for their Club Tropicana theme. I started on this at 6pm Thursday night, thinking, you're a crazy cow because you're NEVER going to get this done in time (what with having to attend an awards do on Friday night at the Tower of London, dahhhhling) - BUT, let me tell you, this pattern is a DREAM.

In total I think this took me 7 hours. The pattern and instructions are so easy to follow and everything went together perfectly.

Did someone say Miami Vice?

I love how this blazer co-ordinates with my pop-art Elvis. Look at Pink Elvis, he's giving it the stink eye, no doubt out of pure jealousy as I am centre of attention again. Yellow Elvis looks a little more appreciative. 

Although I made this blazer for the party, I am actually quite a bit in love with it and will definitely wear it a lot. It's also booked itself a place on the holiday for sure. 

For the party I teamed it with a black lycra (yes, lycra) mini-skirt and vest for that 80s feeling and clashed the whole thing with some leopard print - bag and shoes. I don't mess about. 

The party itself was bloody fun. I had such a great time and I'm in love with everyone. After some important drinking was done we all ended up dancing in Elisalex's kitchen to Stevie Nicks' Edge of Seventeen: oooh baby oooh baby OOOH.

Here's a few photos of the day...I'm shit at taking photos especially when there are tequila jelly shots and cava to neck down my throat, but I did remember to take a few. 

With Fiona and Sally in their beautiful dresses. Fiona was wearing
a very awesome Lonsdale and Sally was sporting another incredible refashion of 
what was once a three-piece suit. 

The most wonderful Nicole Needles. I think she could hula in
her sleep! 

Power posing with the most gorgeous Rehanon. Look at
those prints side by side. What a colour infusion!

Monaco!


Hot legs, are you still in school? Salme shorts.

$
0
0
I've made a pair of shorts for the trip and they're not half bad.

For this pattern, I took a recommendation from Mrs B and checked out Salme Sewing Patterns. A London-based company, which I had never heard of. Don't ever accuse me of having my ear to the ground.

I was really surprised at the quality of fit of this pattern. I made no alterations and I think the fit is pretty good. To be completely perfect I think I would take the waist in a little more, but that is something I can actually fix if I set aside some time and patience to unpick the amazing stitching-in-the-ditching I did, and nip in the waist darts. That way they could sit a little higher and shorter! *giggles like a schoolgirl*

Otherwise I love the fit, especially on my bum-bum, which always doth protest too much in shorts and trousers. It seems to find these agreeable. 

Me just hanging out with George next to a bush

For the fabric I used some gorgeous pink and white striped 100% Czech cotton I bought in Prague.

As I was beginning to make these shorts up I noticed that the cotton, although quite heavy, was still going to be a little see through and would show the outline of the pockets. So, I used some cheap white polycotton I usually reserve for muslin jobs and made an underlining. I then treated the layers as one piece. It worked well and now I don't have to always wear my tighty whiteys!

The rest of the construction was pretty straightforward. However, please note, the pattern does not include seam allowances so these will need to be added beforehand. I had a great discussion on Twitter with fellow sewcialists about the preference of patterns with or without SA, which I have been meaning to do a blog post on. Let me know your thoughts below if you like.


The shorts have a side zip using a concealed zipper and then a neat little waistband and button finish. I cut off a whole lot from the hem as they finish a little longer than I like. The way I do this is to put one leg in side the other, pin and then trim so that both legs are nice and even.


Ewww, George I think others have been here before us

The other good news is that I did make a muslin of these, which I just pin-fitted together (hence an inaccurate reading of the waist fit, tut tut Clarey!) and the fabric I used was the infamous 'Miami Vice' that I used to make my Victoria Blazer. So,when I get a minute I'll sew these up properly. Shit, what an outfit that will make when I'm busting out my jazz hands in New Orleans.

Here you can see the fabric better. Ignore the creases.


Me and George rocking it in some b&w

I definitely recommend this pattern. It doesn't take long and it's a really neat finish with some nice pockets. Go on get those hot legs out, this man is gagging for it.

Wait, do I have hot legs or not?

We can't go on together with suspicious minds: McCalls 6700

$
0
0
I am venturing further into knit territory. At first I dipped my toe in the water and made a Briar, then I adapted the Briar pattern into a long-sleeve basic straight hem t-shirt, then I part-exchanged my old overlocker for Bob, my new Brother overlocker, and things started to get REAL.

So with that experience under my belt I thought it was time to pull out the big guns and make something a bit more lavish.

I chose another McCall's pattern, this time a long maxi dress, which is now going by the name of the 'Suspicious Minds' dress. I'm not quite sure why, but I figure I haven't given 70s Elvis nearly as much attention as 50s and 60s Elvis', and I don't want him to think I don't love him anymore, or that "yeah, you're looking a little porky, no rudies tonight I'm reading 'Gone Girl'".

Furthermore, a maxi dress has that 70s vibe about it and this one in particular made Elvis suspicious because it gives a little emphasis to the bewbs. He should be grateful though, I found this fabric on a market stall OUTSIDE of Rolls & Rems going for a grand total of £5 for 2.5 metres, so more money for jumpsuits and gold.

 Hands on hips, point bewbs, FIRE!

I feel like I am slipping into a mini love-affair with McCalls. After the flamingo romper and now this, I am convinced we are like peas and carrots. Everything fits pretty much as it should and the patterns are easy to work with. 

This dress didn't take any time at all. I cut my size going by the measurements on the envelope and just hoped for the best. First up was the shoulder seams - they are elasticated and required a small piece of elastic being sewn over the seams, which was pretty straightforward. The only tricky part of this dress was the thin ties (seen on the photo of the back). Turning these probably killed a small part of my soul. I took to lying on the bed in the sun and just did them bit by bit. Afterwards, I felt like I had been strumming a guitar all afternoon my fingers were that sore. I used a loop turner and basic elbow grease, but does anyone have another tried and tested method? (FYI, using a needle and thick thread didn't work either).

The ties then had to be sewn over the shoulder seam, so through the seam and the elastic. That was a little tricky to keep neat but I survived. 

After the ties fiasco everything else came together in a flash. I used my overlocker to sew up and finish the side seams of the skirt and bodice, and then my favourite pet, my walking foot, to sew up the tricker bits and the hems. I didn't get any wavy seams or hems on this. One trick I found was as the material is moving under the foot, push it slightly to create some 'slack' and that should help prevent any waviness.  I also reduced my foot pressure.

I totally recommend making the investment in buying a walking foot. They're not only fun as they look like the AT-AT Walkers from Star Wars, but they seriously work and help your sewing. 

  My walking foot. If I like you, I put a sticker on you

Other features of this dress include a mock wrap bodice on both front and back and an elasticated waist.  Everything is really quick and easy to do, and it's easy to adjust the placement of the mock wrap sections should you require it to be more fitted or if your bewbs need some space. 

The waist tie for this dress is so long though, I reckon I could use it to escape out of the window in the event of a fire, or just a novel way of leaving the house. Not sure why they make it that long, but I assume it's to be double wrapped around the waist line, which I have done here as I stand next to a street lamp. These are my first photos using a self-timer and mini tripod. It took forever. Think I will revert back to my assistant, Mr S, in future. 

Outside party central: Chez Szabo

Overall, I am really pleased with this dress. It made its debut at Canada Day in Trafalgar Square and after  I washed it, I warily tried it on and everything has maintained its shape, bazinga! 


Canada Day with Mr S. Yes, he has a transfer stuck on his head. 

The Mississippi Delta was shining like a national guitar

$
0
0
As if you all didn't know already, but there will be a short hiatus from Dixie Lou for 3.5 weeks.

Hey wait. WHATEVER. I'm going to try and blog, instagram and tweet the hell out of my time in the deep South. I have the Graceland dress to show you after all right? Which, thankfully is finished. What? Oh yeah I still have to hem it. FUK. Okay I'm going to eat some rocky road, make some calming tea and FINISH it. Maybe Walter White will help. No, he's what has gotten me into this mess, right @Gingermakes?

Gawd, I hope Elvis appreciates all this hard word.

Our first stop is Boston, then to Dollywood. Thankfully, @lbreton is leaving me her bewbs there for a temporary loan. No way I'm hitting those mountains without some good mountains of my own. You get me? Hopefully the bombshell swimsuit will stay together for a couple of photos. I daren't take it to Dolly's splashpark though. Visions of me plummeting down a water slide, my dodgy zig zagged seams popping all over the place. Oh well, stiff upper British lip, tip my hat and bid everyone a good day.

After frolicking in Dolly's mountains, we go to Nashville, where I will be meeting up with Miss LLadybird herself. Excited.

Then, it's...

What?

Who?

THIS GUY!


HOLY SHITE! After Elvis leaves me high and tired, we hot foot it to New Orleans where we meet up with Mr Szabo Senior to celebrate his birthday. August babes are the best. Then it's Canada bound for lakes, swimming, beaver tails, birthday fun and meeting @Gilliancrafts, @Gjeometry and @Aem2 in Toronto. I hope they will become our next international Spoolettes!

So, I bid you farewell readers. Oh and can someone check in on Don Robot from time to time? He's not taking this impending separation too well.

Minerva Crafts Blogger Network

$
0
0
Greetings from Nashville everyone!

Before I hit the streets with Mr S looking for high-fat lunch and Tennessee action, I wanted to quickly grab the hotel computer to say how truly happy and excited I am for the Minerva Crafts Blogger Network.

I feel so lucky and honoured to have been selected for this new venture and can't wait to show you all my first make. I'll be taking pictures of my dress in Memphis. What better then to introduce my first make from the home of my boyfriend, EAP. Stay tuned, it will published on my birthday! What a great coincidence and b-day pressie for moi.

Hopefully you all know by now that Minerva Crafts have launched a blogger network. I am part of an amazing team of 8 - you can find out who else is in the network on the official Minerva Crafts website.

Each month, we'll each blog a post showing an outfit or craft we have made using fabric from the amazing variety on offer on the Minerva website - and believe me when I say variety, I mean billions of things to choose from. Okay, not billions, but there is so much choice it's a mecca for the fabric enthusiast and yeah I am looking at YOU. And, what's more, Minerva are a family-run company with such kind and excellent customer service. I've really enjoyed my correspondence with Vicki in getting this network up and running. I can't recommend them enough!

For each make, the team will use patterns, fabric and notions and if you like it you can buy our kits! We'll each have our make made up into a kit that will include everything you'll need to recreate our look. I love this idea, especially because each blogger will no doubt give you insight and tips into how best to work with the chosen fabric, pattern or notions used.

I hope you all enjoy following our makes. Thank you to Minerva Crafts for such a great opportunity and good luck to the rest of the girls on the network, I can't wait to see what you do. Rachel has already posted her first make, which you can find here. I have seen this dress in person and it looks stunning!

Well, I am off into Nashville with Mr S. Speak to y'all real soon. Love xx

The Sun Studios McCalls 6696 shirt dress

$
0
0
Not only is it my birthday today, but it’s also my first blog post for the Minerva Craft Blogger Network. Bring out the party streamers people!

Considering that my first project for the network was due to be published during my dream holiday to America's deep south, I decided to make something ultra summery with a vintage vibe to wear to the legendary Sun Studios in Memphis. For me, there was no better place to photograph this dress... well, there’s Graceland but that’s another story for another time.

In recent weeks I have become quite a fan of McCall’s sewing patterns, so I immediately jumped at the chance to make the pretty shirt dress (6696), which is available on the Minerva Craft website.

Rocking a Priscilla Presley hive outside the birthplace of rock 'n' roll!

The pattern features four dress variations and one pattern for a slip, should you choose to use sheer or eyelet fabric.

Inspired by the many dresses Betty Draper wears to smoke and drink wine in her kitchen, I opted for version A: the sleeveless shirt dress with pleated skirt.

Choosing the fabric was not easy. There is so much variety on Minerva, and so many combinations that would work for this outfit that I wanted it all. However, inspiration struck again when I saw this dainty polyester. It’s so beautiful, you will "ooh and ahh" out loud when it arrives on your doormat. Don Robot also loves it when he comes home from grocery shopping and finds me looking miserable and dissatisfied sitting at the kitchen table, two glasses of wine down. I still take his hat for him though.

Is that Johnny Cash coming down the road?

I loved making this dress. At first I thought the fabric would pose some problems as it’s a ‘slinkier’ polyester, yet it was a dream to sew with. A dream I tell you! It did everything I wanted it to and didn’t shift one bit during sewing. This included the more complicated parts such as the collar and belt bands. It also traveled really well – I hardly needed to iron it and when washed, it dried in an instant. Oh, and some red wine was spilled on it, but with a rinse under the tap it washed right out. Could you get a better best friend in fabric form?

 Elvis likes his women in gold belts too

Before starting this dress, I really recommend measuring the flat pattern. This is an exercise that I don’t usually do, but I applied it to this project and was surprised that I needed to cut a size 10 as opposed to my usual size 14 measurements. Of course it depends on your preferred style/fit, but this is definitely something I will continue to do with future patterns. It’s really simple to do: just measure the key areas and be sure to multiply twice (e.g. for front you need to multiply twice to get the full measurement) and subtract the relevant seam allowances. You’ll then get an approximate measurement and from that you can ascertain how much ease has been given to your size.

After measuring, I made a muslin of only the bodice (to be on the safe side), and it fit like a glove. Bazinga! The construction of this dress was really straight forward: I love yokes and find them fun in a geeky way. There is also some gathering on the back of the dress which adds a really nice detail, oh and be prepared for a big pleating session. The skirt is pleated all the way round the waist, however, this is really easy to do as long as you follow all the markings on the pattern.

 Back of the dress: gathers are placed at the yoke and waist

The dress features a faced waistband with belt loops. This is easier than it sounds and gives the dress a neat and tidy finish inside. The belt loops are simple to make and are basted before the waist band is added to the bodice and skirt.

I completed the arm holes with white bias binding, which I finished with hand stitching (slip stitch). I serged the seams inside to save time but I handstitched the finish of the button placket, yoke, collar and the dress hem to avoid any machine stitching showing on the outside. I used simple white buttons and didn’t need to shorten or lengthen the dress at all.

 Perfect for some rock 'n' roll twirling

Or for just hanging out at Sun Studios...


...looking cool

I love this dress and it will definitely be one of my go-to sewing patterns in the future. I can’t wait to try some of the other versions as well as the slip. If you like my version, don’t forget you can buy the whole Dixie Lou kit for this dress on the Minerva website. 

The Dixie Lou shirt dress kit

And what did my boyfriend Elvis think of my dress? Well, he decided to play a little song for me with the help of his pals while he gazed lovingly into my eyes...

The Bombshell Swimsuit: N'awlins Style

$
0
0
After the mad rush to get my version of the Closet Case Files Bombshell Swimsuit pattern finished, I didn't end up trying this baby out until I got to New Orleans. However, that place was so hot I couldn't wait to get in a swimsuit and some cold water. Funny thing is, New Orleans really was so damn hot that even the outdoor swimming pool was like a warm bath. However, me in a cold shower wouldn't have been the best picture so here's me in front of a fountain at our hotel, the Maison DuPuy, located in the French Quarter of New Orleans.

A little unsure of posing in a swimsuit in front of people

I chose version B for my swimsuit as I liked the plunging v-neck. Mr S also deemed it to be the sexier of the two versions.

I enjoyed making this project, mainly because it is my first venture into swimsuit territory. I did want to take this with me on holiday, but I also treated it as more of a learning process/muslin, which if successful then great, but if not, no biggy.

If I sit-pose, they can't see me

Fortunately, it turned out acceptable-ish and definitely wearable. I love the fit of this swimsuit and find it really flattering across all those bits we usually like to hide when relaxing by the pool. My favourite thing about it, is how it sits on the bum-bum. It really gives it that bombshell look reminiscent of some of my favourite screen sirens: Monroe, Betty Grable and Jane Russell.

Old photo style

The instructions are pretty good for this pattern. In some places I was a little "uh...wut?" but I figured it out with some re-reading and brain tuning. I would also advise practicing your zig zag stitch length/width on scraps first before you start, unless you choose to overlock/serge your seams. The seam allowances are only 1/4 inch so it's important to be accurate and to make sure you line all raw edges exactly, otherwise you'll find some raw edges will slip and not be sewn. (Grrrr, yes this happened!)

For fabric I chose leopard print. It's one of my favourite types of print and I also fell in love with a picture I found of Liz Taylor rocking a similar swimsuit. I bought my fabric and lining from Fabricland, which in total cost me (including the swimsuit elastic) £13.

The plunging neckline is not only sexy but also tasteful. I didn't feel over exposed in this and I really appreciated the positioning of the front bust sections: Heather advises to pin the bust triangles approx an inch past the side seam to avoid side boob and roughly 3/4" apart at the centre bust. In doing so, I think this helps to maintain a more demure and chic swimsuit as opposed to a full on "I got bewbs" look. Not that I am in great supply of the latter, but should you have some nice pillows you'll be thankful for this coverage.

Drying time takes a while because there's quite a bit of fabric involved, but hopefully you'll be wearing this because you're in a beautiful hot location. Other than that it's a really fun project and a great starting point if you've never worked with swimwear before.

Having made this first version, I feel that I have a better understanding of how to make this type of garment, and how best to work with this fabric. Next time around, I'd like to try and high waisted bottom with a bikini top, but maybe next year :)

Jazz, the Mississippi and some blues.

As for New Orleans, what a great city! Driving into Louisiana was so fun, especially travelling over the bayou while listening to Elvis''Polk Salad Annie'. We stayed in the French Quarter, which was so busy and colourful. The famous Bourbon Street stunk of vomit so we ventured out onto Frenchman Street (recommended by sweet Elisalex) where we found some great music including some real rhythm and blues, and a ten-piece brass band that mixed traditional jazz with a more funky, modern sound. During the day we walked around, taking strategic air-con breaks in shops and cafes, or eating Beignets (ermagherd, yum!). We also took a ride on a traditional steam boat along the infamous Mississippi river; it's hard to top an afternoon where you're sipping on a bloody mary, listening to some jazz and watching the world float by without a care in the word. Ahhhh New Orleans, see you again one day.

Bloglovin

Hey y'all, this is my voice and junk

$
0
0
During my coffee break this morning, I sat and watched the videos uploaded by other sewcialists showing off their lovely voices and different accents. (Thanks to Lady Katza for starting this back up.) And, I thought, hey wouldn't you all like to hear the cringey sound my vocal chords make? I hope you laugh at me as much as I laugh at myself. Seriously....#CRINGE

Anyway, there's a list of words and questions we have been given to say, which are as follows:

List of Words: 
Aunt, Route, Wash, Oil, Theater, Iron, Salmon, Caramel, Fire, Water, Sure, Data, Ruin, Crayon, Toilet, New Orleans, Pecan, Both, Again, Probably, Spitting image, Alabama, Lawyer, Coupon, Mayonnaise, Syrup, Pajamas, Caught

List of Questions:
What is it called when you throw toilet paper on a house?
What is the bug that when you touch it, it curls into a ball?
What is the bubbly carbonated drink called?
What do you call gym shoes?
What do you say to address a group of people?
What do you call the kind of spider that has an oval-shaped body and extremely long legs?
What do you call your grandparents?
What do you call the wheeled contraption in which you carry groceries at the supermarket?
What do you call it when rain falls while the sun is shining?
What is the thing you change the TV channel with?

HERE GOES - OH AND I HAVE NO IDEA WHY I KEEP TOUCHING MY NOSE. DO I DO THIS????! *touches nose*


Let's all welcome Gentleman Jim

$
0
0
There's a new sewer (sewist, seamster....aghhh I give up!) in the sewing blogosphere and it's a man. Yey!


Welcome Gentleman Jim. Here's a little bit about him:

Gentleman Jim, a master tailor, pattern maker, designer, sewing instructor and clothing manufacturer, has been active in the garment industry since 1961. He began working in the garment industry in 1961 at all the finer men’s stores. Weber and Heilbrunery, John Davidson, Barney’s Men’s Store and  The Macy.  At age 20, Gentleman Jim began under the mentorship of Orie Wells of Orie’s Custom Tailoring, an exclusive tailoring store. Orie’s was located on 125th Street in New York City next to The Apollo Theatre. In the 60’s, Orie’s made custom clothes for all the great stars: James Brown, The Isley Brothers, B. B. King, Duke Ellington, Billy Strayhorn, James Cleveland and many more.

He now has created a super cool blog, The Lost Art of Fine Tailoring, which you can find here.

To celebrate joining the blogging community he's giving away a fantastic set of his Alteration DVD. This DVD looks amazing and I am definitely keeping my fingers crossed for a win. You too can enter here! All you have to do is leave a comment on his blog and also post something on yours. Simple!

So lots of love and luck to Gentleman Jim in having a successful blog, and lots of luck to you in entering his awesome give-away!

Me, Elvis and the Graceland dress

$
0
0
I'm not sure if you know about this, as I kept it really low key, but I went to Graceland. Oh who am I kidding, I pretty much got a loudspeaker and shouted about it everyday, but it was a 21 year dream in the making. I'll warn you, this is a long post with lots of photos, but it's not everyday you go to Graceland, so sorry/not sorry :)

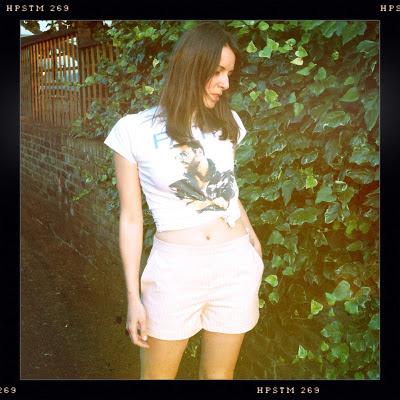
Well, what do you wear to meet Elvis? For me, there was only one look that I wanted to recreate and that was of Maile Duval in Blue Hawaii, played by one of my favourite actresses, Joan Blackman.

Blue Hawaii is a really special film to me. It's not only my favourite Elvis film, but also the film that a young 13 year-old me watched and thought "hey, who is THAT guy?". I asked Mama Delle and she explained who he was and how much she had loved him as well, and from then on, she bought me a calendar every Christmas. The love affair started.

Here's a picture of Joan Blackman and Elvis in Blue Hawaii. Joan kicks off the film wearing this great dress and red flower in her hair. Unfortunately, I cannot find a good quality colour photo to show you, but if you google it (or better yet, watch the film) you'll get a great idea of how gorgeous this dress looks on her.


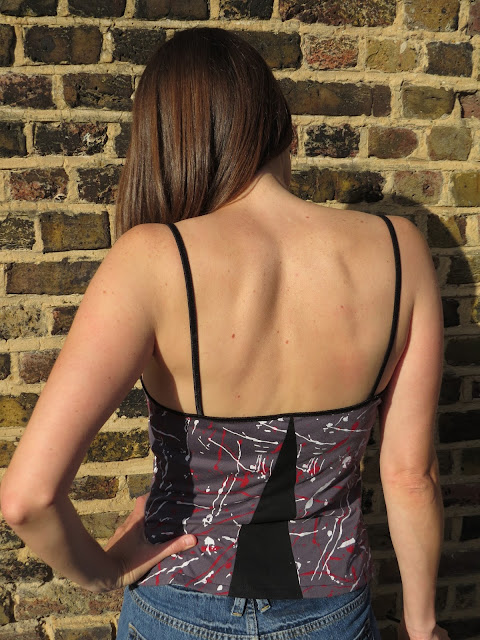
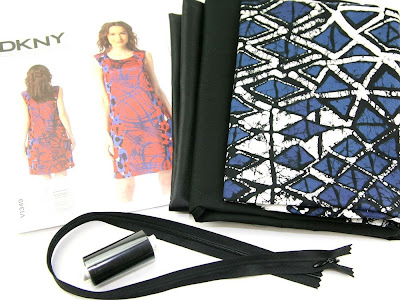
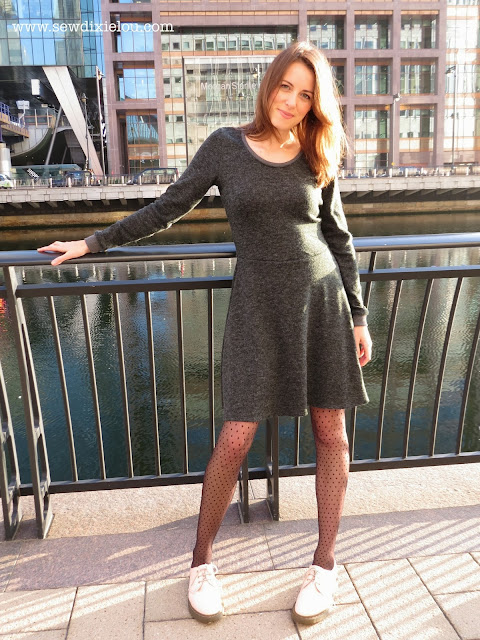
So, my plan for Graceland was to recreate this outfit. In my stash, I had been hoarding some great fabric that I had bought at Mood early last year on a trip to NYC. It's an Hawaiian-inspired green and white print in a soft stretch cotton.

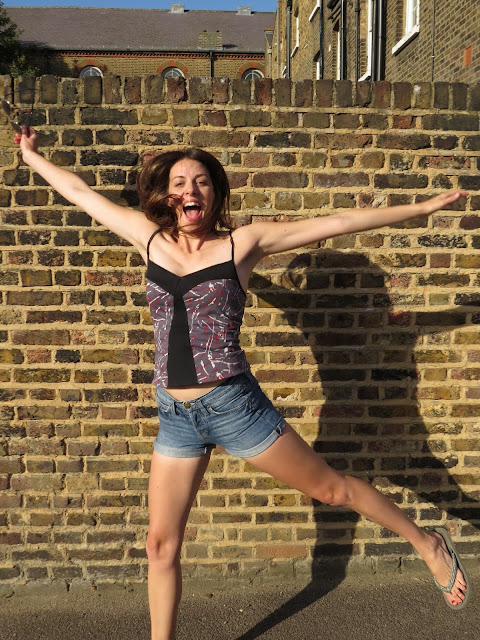
Maile Duval ready for Elvis! Don't you just love
my new Bettie Page bag? I got this in Nashville.

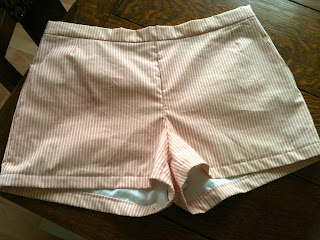
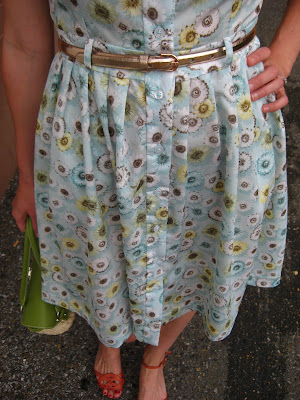
For the pattern, I self-drafted a bodice and skirt to ensure that I got the exact fit I was after. I kept things quite simple with bust darts and waist darts on the bodice, but scooped the neckline low on the front and back, and shifted the shoulders over to create that early-60s look.  The skirt of the dress was pencil-like in design and as the fabric had stretch, I didn't need to create a split or vent. Hooray. 


Just arrived at Graceland. I promise you I was far more excited
than this picture suggests. Sun in eyes = face contort!

I styled the dress with a vintage white metal belt (inherited from Mr S' grandmother), red wedge sandals, my new Bettie Page bag and an artificial flower. The flower is a funny story; there are ZERO florists in downtown Memphis. ZERO! Not even a store that sells a bouquet of fresh flowers. Obviously people in Memphis don't like flowers. In the end, the concierge at the Peabody hotel gave us the address of their supplier so my wonderful Mr S drove me there to find a suitable flower for my hair.

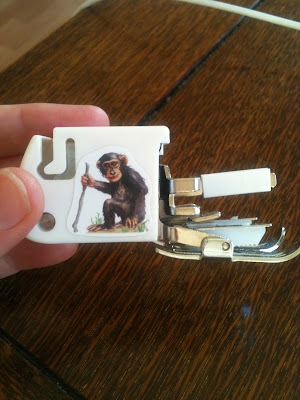
I inserted a lapped zipper but could I get the waist seam to align? For the love of Elvis, no! Despite having stablised the zipper seam and hand basted the zipper, that waist seam was giving me the finger every time. After a rant to my beloved Roisin, she suggested hand picking the zipper in. YES! Why did I not think of this? It worked swimmingly for my wedding dress (yeah I just said swimmingly, sue me!) and if it was couture enough for marrying Mr S, then it was certainly couture enough for the King. 

Dixie Lou Tip
One great tip for hand picking your zip is waxing your thread. When I made my wedding dress (you can see that here) I followed the legendary Susan Khalje's book Bridal Couture. This book is out of print and I paid a small fortune for it, but it was invaluable and I still refer to it for general sewing projects. She advises to buy some tailor's wax, which you run your thread through. You then carefully iron the thread to seal the wax (place a pressing cloth on the top, I use silk organza) and then double up the thread as normal. This technique helps prevent those shitty knots happening when you hand sew buttons and zips. I do this for most of my hand sewing now and it really helps. 

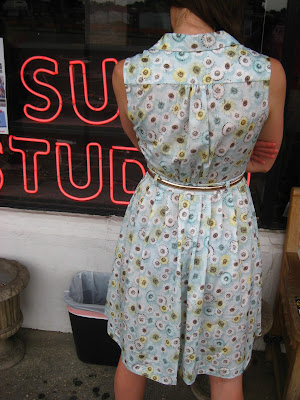
I used an all-in-one facing to finish the neck and armholes, but cut it just above the bust line to prevent having to do darts again and creating unnecessary bulk on the bust. To save time, I serged the inside seams and handstitched the hem.

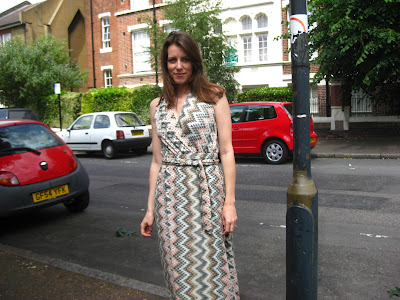
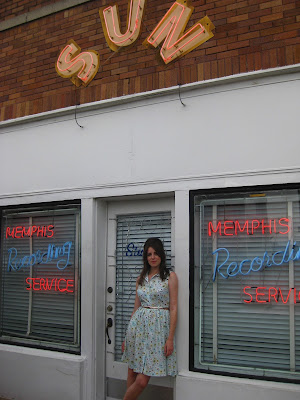
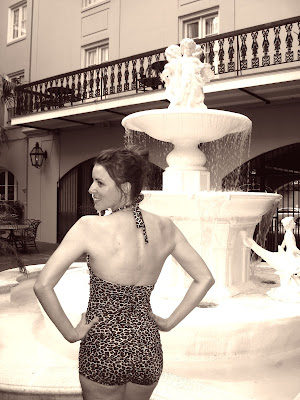
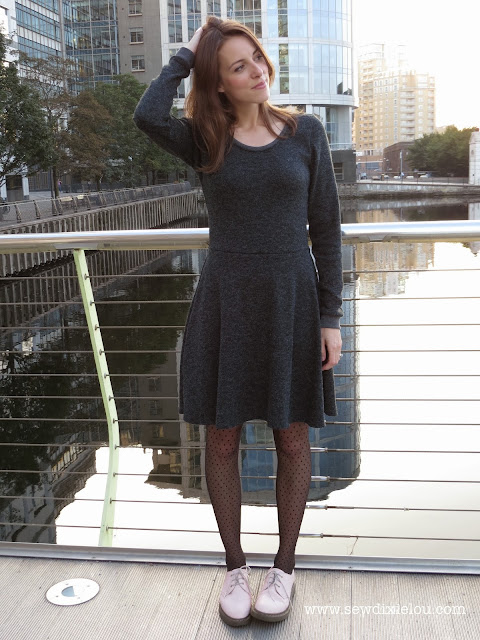
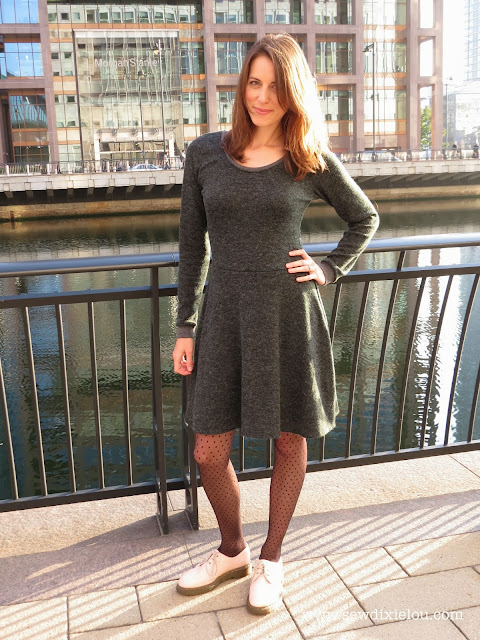
I was so pleased with this dress. It was exactly how I wanted it to look and I felt great walking around the home of Elvis dressed (in my mind) like Maile. Here are some close-up shots of the dress after I had been to Graceland - hence dropped out curls, missing belt etc, but just look at the happy glow on my face!


Beale Street!

And now onto Graceland. Ermagherd. This really was a dream come true. Driving into Memphis the night before I had tears, and then driving along Elvis Presley Boulevard to Graceland I had tears again. I can't stress how important this trip was to my little heart.

Graceland was everything I wanted it to be. Mainly, I just loved walking through the front door and into Elvis' house. It was 5 million Christmas' at once, finding money down the back of the sofa every day, or feeling so fricking happy in that one moment, you're not sure how to contain it.

Basically, it was fantastic.

The rooms at Graceland were over-the-top, kitsch and just bloody wonderful. Although, I knew so many people had visited before me, in my mind I was treading where Elvis had walked. I had to restrain myself from jumping on the sofas, or touching everything, and then I secretly seethed with anger and jealousy when a young toddler ran under the rope and sprawled out on one of Elvis' leather sofas in the room next to the squash court. Hey kid, get off, if anyone is breaking the rules round here it's me! (I did lean over and touch one of the sofas in the jungle room though. Rebel scum!)

I could go on and on about this day, but I won't bore you. Let's just say it's one of those days that will stay with me forever. Here's a selection of photos and thank you for getting this far in the post.

As Graceland was my dream trip, is there one place in this world you HAVE to or are dying to see?

This is the first room you see as you enter Graceland. 
It's the room where Elvis and I welcome our visitors. 

Ha, Elvis! What are you like taking photos of me in our 
TV room, you're such a goon.
(and yeah, we need 3 TVs, so sue us!)

Hanging out in the jungle room

Priscilla's My wedding dress on display

Out at the Presley paddock

This photo? Oh that's just me boarding the Lisa Marie
 to go get some groceries

The piano Elvis was playing the day he died :(

Jeez, it takes me a long time to sew these jumpsuits for him

Grilled peanut and banana sandwich of course!

Everyone thinks Elvis bought this for his Mom. No, it's my ride.

Outside Graceland with Don Draper

Laying the flower from my hair on Elvis' grave


The Airelle Blouse: Pleather Treatment

$
0
0
This blouse took me way longer than it should have done. Mainly because the vintage fabric I used was an utter bitch. No joke, I reckon it would have spat in my face if it could have done.

After deliberation over what fabric to choose (with the aid of Twitter/Instagram, we chose the 'crazy cookies' aptly named by Emmie), I had the feeling that making the entire top in 'crazy cookies' could end up looking a bit boring or a bit old lady. So, I decided to use some left over pleather (come on people, no need for leather anymore!) I had in my stash from my 'Pleather Peacock' dress and this is how it turned out.


The blouse is a great pattern to put together, very simple with clear instructions and basic techniques (gathering, yoke, waist darts). However, when you have the bitchiest fabric from hell, it all suddenly becomes exhausting and you wonder why you even started sewing. Okay, maybe not that drastic, but this fabric tried to destroy my soul.


The main problem was skipped stitches. It's a vintage polyester of some kind and it just didn't want to be sewn. I tried various needle changes, thread, tension, you name it I tried it. After investigation on Google, I even tried a ballpoint needle as one person mentioned on an interesting post in 'Yahoo Answers'. But no, this fabric didn't want to compromise.

The only way it cooperated was with the use of tissue paper on the seams. This worked fine but is something I just find annoying to do. All that unpicking etc, urgh, life is short. In the end, I used strips of black silk organza, basted them over the seam line and then stitched normally. Albeit time consuming, this seemed to work perfectly and was far neater.


But, back to the good stuff. I measured the flat pattern and decided to cut a size 38. I didn't make a muslin as I knew this top was supposed to have a slightly loose fit, and it turned out perfect. Thumbs up to Deer & Doe. I'll definitely try this pattern again as it's a great staple as far as tops go for work or smartening up jeans.

The construction is super easy and would make for a great beginner's introduction to gathers and cuffs. Definitely try it out!

For the collar, I used some pleather that I had bought from Dalston Mill Fabrics. This is £9.99 a metre and at the time I bought 1/2 a metre and it's starred in two projects so far, nice going pleather!

Working with pleather is really easy. I use either a sharp or a leather needle, and either works well. In this case, I found the sharp worked better. You can use a teflon foot to help glide over the pleather or I have read posts where scotch tape has been stuck to the bottom of the foot. I am yet to try this method.

The only thing is you need patience working with this stuff, especially when it comes to pressing. You'll need a good pressing cloth (I use my faithful square of true silk organza) to prevent melting it and time! You need to go easy and really talk to it, "come on baby, you know you want to lie flat and look pretty, come on don't say no, Mama don't like no", that kind of stuff. If that creeped you out, sorry.

Eventually, your pleather will submit and let you turn it into a collar. I have made a studded detachable collar using this as well, which looks kinda cool. I'll try and dig it out for photos.


As pink is one of the big colours for A/W 13, I teamed my new Airelle blouse with my Whistles wool mini skirt, tights and my favourite black patent 'boy' shoes. It's hard for me to find nice vegan shoes, but I found these earlier this year in Next for a mere £26.

Oh and it's Autumn! Yey, my favourite season of all. What are you looking forward to wearing?

(Credit to @Shorak for correcting my wonky photos!)

Disparate Disciplines Yellow Tail Camisole: Funky Paint Splash

$
0
0
At the end of August, Mari from Disparate Disciplines asked me to test sew her fab new pattern, the Yellow Tail Camisole, named because it resembles the tail of the fish, Yellow Tail Snapper.

I was really excited not only to be asked to test sew but also to try something new in the world of sewing with knits. And, in this case, this was the neat colour blocking shapes and fold-elastic incorporated into Mari's awesome design.


As Mari describes, "the Yellow Tail Camisole is a comfortable yet cheeky knit" and is great paired with jeans, worn at the gym or as a casual cami under a top. You can make it one solid colour, or colour-block it as I have done here. I used some awesome paint-splash jersey I found at Rolls & Rems in Lewisham, paired with a solid black cotton jersey. You hardly use any yardage - I used less than half a metre, so you could seriously whip up a bunch of these in different combinations. Perfect!


Mari's pattern is really clear and easy. Everything goes together extremely well and I stitched my pieces using a 3-3.5 mm straight stitch (with my walking foot) as recommended by Nancy Zieman in the book Sew Knits with Confidence. As my knits were both pretty stable I didn't need to use a zig zag stitch.


The design incorporates a clever facing (the black section above the bust) which folds over itself. The top is then finished with fold-over elastic which completes the raw edge of the back and the armholes, while creating the shoulder straps. You get to pin the shoulder straps to the length you want, according to what kind of 'lift' you want. In my case, all the help I can get sista!

I have never used fold-over elastic before and practiced beforehand as Mari suggests in the pattern instructions. I ordered some black fold-over elastic off Ebay for minimal cost. You can use either side of the elastic, but for this top I had the shiny side showing as I thought it added extra detail. Sewing the elastic didn't seem too difficult and I coped quite well, but you do need to be careful not to stretch the back. Any good tips for sewing knits and elastic without causing poopy stretching?


I really love this pattern and can't wait to make some more. Next time I will make one for the gym (maybe get some badass neon going on) and I also want to make some pretty night-camisoles out of this cute flamingo jersey I have. The options are endless.

The other great thing about this pattern is that Mari is offering it as a 'Pay What You Want' option. This means that you get to pay exactly what you want be it zero to $100! However, 50% of all proceeds go to charity to fight hunger in America, which is pretty awesome if you ask me, and, when combined with all the hard work that goes into producing a pattern, means this is definitely worthy of a price of a coffee or two (or 3 or 4!), am I right? HELL YES.

Yey! Pay for this pattern and give something to charity people!

Minerva Blogger Network: Batik DKNY V1349 dress

$
0
0
Wow, I can't believe it's time for my second post in the Minerva Blogger Network. You can see my first (the Sun Studios McCall's Shirt Dress here).

This time around I opted for something a bit bold and different, and a move away from Summer. Anyone else done with summer sewing? To begin with I chose a Vogue pattern: the DKNY V1349. I liked the styling of this in the pattern pictures, it's very editorial (as Nina Garcia would say) and I liked the fact that it could be fun to make by combining up to three different prints.

V1349 pattern picture

However, in my version, I decided to go for a solid colour and just one print in order to demonstrate how you can bring some wilder prints into your life without feeling too OTT. Here's how it turned out!


My dress features an amazing Batik print in shades of blue, white and black from the Minerva cotton range. I teamed it with a solid black poplin to subdue it slightly and give it some nice clean lines. With regard to S/S 14 trends, I think I'll store this dress away until the spring. Donna Karan showed some similarly interesting blue prints and Victoria Beckham showcased three dresses in her 'Victoria' collection, which had a very similar loose fitting silhouette. I did try the dress on with tights, but I like it with bare legs and my 'boy' shoes.


The pattern consists of subtle princess seams and a shoulder yoke, which means you do not have a shoulder seam. The shoulder yoke can also be a contrast print but I decided to keep it black in this garment.

There is an invisible zipper on the back and the lining finishes the neck and armholes.

When I made the muslin of this dress I cut a size 10 on top blended into a size 12 on the hips/length. I loved the fitted finish on the bust, but as the dress was styled to be 'loose fitting' I cut a complete size 12 on the finished garment.

Another plus about this dress is that it's a day-to-evening look. I discovered that it works equally well with a white shirt underneath for a bold, office look and then on its own for cocktails at Janet's bar (right, Spoolettes?)

Hold on, Don, let me take off my glasses and let my hair down. 
Now show me your report. 


A few things to note about this pattern:
  • When sewing seams, some have an ‘awkward’ finish with a sharp point. Make sure you catch those sharp points as you come to the end of sewing the seam. They create a nice flush edge on the neckline and other areas when sewn properly.

  • The fashion fabric and lining are not constructed traditionally. The outer fabric is constructed and BEFORE the side seams are stitched, the lining is stitched to the neckline and armholes to finish those seams. Then, the garment's lining AND dress side seams are sewn in one continuous seam. 

  • Don't forget to clip seams (neck line etc). It does say it in the instructions in the symbol boxes but doesn't remind you again in the actual steps. 

  • This pattern requires Staytape on the neck and armhole edges of the lining. If you have it, great, but if you don't, don't worry! I used a strip of silk organza instead. My lining did still stretch on the neck line at the front for some reason (possibly because my organza was too much on the straight grain?), but I rectified this easily by creating a little pleat, which actually looks quite nice, and as this lining is very light, it didn't create any bulk. If I make this dress again I will try just stay stitching the neck line instead with a lighter pressure foot and tension.

  • The Batik is a light cotton, so make sure you stabilise the zip seam with interfacing before sewing the invisible zipper. 

  • I ended up with the dreaded back neck gaping again. On the size 10 muslin, it was fine but I think the extra room on the 12 caused a problem. For now, I have added some darts, which don't look out of place as the back is quite geometric in style anyway, but in future I will take extra from the zip seam. 

  • Ever so slightly, I find that this dress wants to pull back at the shoulder. This is more a standard fitting issue I have with my shoulders and commercial patterns (particular these types of shift dresses) and an easy modification when I make this pattern again. 
Overall, I enjoyed making this pattern. I liked the unusual construction and the interesting lines of the shoulder yoke. I think this dress has alot of versatility in terms of season, day/evening and shape. I also love the extensive colour/print options you can play around with.

If you love my version, don't forget you can buy my kit from the Minerva website here.


Ready for Autumn: the Lady Skater dress

$
0
0
Confession time. I didn't think I would ever make this pattern. It's not that I didn't like it, I just didn't think it was me or how I would wear it.

BUT. THEN.

I saw some of Lauren's awesome versions and thought about how this dress would suit my plans to sew a more 'grungey' wardrobe for Autumn, and I got visions of comfortable, cosy winter dresses with tights and Docs and plaid shirts. Yes, people, at times I will be living like it's 1993, dating Eddie Vedder and drinking coffee with Matt Dillon.

AND. FURTHERMORE.

Despite my recent grumbles about customer service, I ventured back into Rolls & Rems (Lewisham) and found this amazing winter knit jersey in a beautiful charcoal. People must have thought bitch be crazy as I held it up against my bare arms and stroked it with my face, but seriously, I cannot tolerate itchy fabric or fabric that leaves a little hairy trail on my coat. However, this fabric is probably some of the best fabric I have bought in a while and this dress....WELL I LOVE IT!


I'm wearing this dress with my new polka dot tights (Marks and Spencers, £7) and my baby pink 3-hole Dr Martens. Polka dots are enjoying a little comeback this season, see the adorable skirts and jackets in Miu Miu's collection for full-on polka love, or team sheer polka dot fabric with harder, masculine pin stripes for a city chic look as seen in Vogue (Sept 13). This might be something to try WHEN I can eventually find some polka dot fabric I like.

I also tried this dress on with my beloved boy shoes and it looks great as smarter wear for work, so it will definitely rank as one of the more versatile pieces in my wardrobe.


This pattern was a total joy to work with - Amanda, I salute you! Because I loved my fabric so much, I decided to make a muslin to check the fit. According to the pattern sizing, I was a 4 on top blending to a 3 on the waist. However, after making up the muslin and despite an overall pretty good fit, I noticed my the waist was sitting too low and I also had a fair bit of surplus fabric around the arm and armhole.

To rectify this, I shortened both bodice sections by 1 inch and cut a 3 on the entire bodice and sleeves. I also shortened the skirt an inch (which, when combined with my shortened bodice) gave me the length I wanted.


I wanted to do something different with the neckband and cuffs, so I decided to order some ribbing fabric, which is typically used for sweatshirts. I purposefully ordered a different charcoal so that it would stand out. I love the finished effect and for some reason I now think of this dress as an Alan Partridge 'Sports Casual' - right Roisin?


Making up this pattern is so quick! Once you have done a muslin and corrected any fit issues, you can literally cut and sew this baby up in a few hours, maybe quicker. I mainly used my overlocker to sew and finish the seams, but also used my regular machine to first sew any tricky bits such as the neckband. I added clear elastic as per Amanda's instructions and I think this definitely helps this dress ALOT. I got 5 yards off eBay for next to nothing.

For my regular machine this fabric loved a stretch needle (size 75/11) narrow zig zag and my pressure foot set to 1. On my overlocker I set the pressure to the lowest it would go and, after testing scraps repeatedly, there was no stretching. YES!


I wore this dress on a little cinema date with Mr S in Canary Wharf and it was so warm and snug I didn't need a coat. Well, this week has been nice weather wise anyway, but I'm confident this dress will see a lot of action come colder days.


I am definitely making another version of this dress. I have just ordered a sample of black bamboo jersey to make either a short or 3/4" sleeve version for under a plaid shirt to be called 'The date with Eddie dress' (see these Vans from my mood board as inspiration). I need something easy and comfortable while we write songs and make out. You know, normal stuff you do with a grunge sex god. 

Have you made this dress yet or are you planning to?


{Playlist: The Replacements - Here Comes a Regular}

Did anyone notice I was gone?

$
0
0
No? Oh. Well if you did, I thought I'd just give you an update on what's been going on in the world of Dixie Lou. Mainly, work and travel are the two things that have kept me away from the blogosphere and my sewing machine. Although I have missed crafting and being knee deep in fabric and pins (ouch, perish the thought!) it's also been quite a nice break.

My first trip was an annual team meeting that my work organises in Munich. We have an office based there so we plan our October meeting around Oktoberfest, not bad eh? We all have to wear dirndls (or lederhosen if you're of the meat and two veg variety) and after a couple of days of meetings, we get to relax and let our hair down with steins of beer. Um...... YUM.


Fortunately for me, I got to borrow a dirndl. They're pretty expensive to buy, but with better planning I will definitely make one for next year as they're so fun and pretty. Here's me and my lovely colleague, Danielle.


From Munich, I then flew to Vienna where I met up with Mr S to drive to Budapest. We decided to spend the weekend there as I had never been. I'm so glad we went as I completely fell in love with this city. I didn't expect it to be so beautiful and accommodating - so, if you get the chance, go, it's fantastic!


We walked around for ages just taking in the sights and the beautiful Danube. We also spent a portion of Saturday evening just relaxing in one of the outdoor thermal spas. Such a civilised way to spend an evening sipping beer, talking to people while basically sitting in a huge bath. Fab!

I of course hunted out some fabric shops. These were quite an experience. In the first shop I got into trouble as you're not supposed to touch the fabric. What?! Oh no wait, you have a sample wall? Ooops, okay I'll just finger that then. Communication was zero here as they didn't speak English and despite my surname, I can only say 'thank you', but we got there in the end. I did love this shop though because once your fabric was cut, it got sent down a little chute to the till at the bottom where another lady wraps your fabric for you. Talk about service!


The following weekend after Budapest, we jetted off again to Belgium. Mr S was already there for work so I took the Eurostar to meet him. We stayed one night in Brussels and then spent most of the weekend in Bruges. Before we left for Bruges, I went to THE best fabric store I have ever been to. Okay, I didn't get the star struck chills that I get in Mood, but in terms of shop design, fabric display and choice, this wins hands down. Sorry Mood, but you need some planes and boats in your store, oh and your cutting tables should be old pool tables too!


If you're ever in Brussels then go to Chien Vert. It's absolutely stunning inside and the choice is incredible. Even Mr S said we can make trips back just for this shop. What a guy!


This is also why I love him.

So now, I'm back home for a bit and ready to get stuck into some projects. Tomorrow my latest Minerva post will go live - I'm excited about this one and have already worn it a couple of times - I hope you like it.

In other big news, I have an awesome giveaway planned to celebrate reaching 500 followers on Twitter. I have a surprise collaboration for this, so look out next week for the blog post announcing the giveaway. Until tomorrow!

<Playlist: Mind Your Manners - Pearl Jam>

Viewing all 85 articles
Browse latest View live